Showing posts with label Decorations. Show all posts

6.20.2012

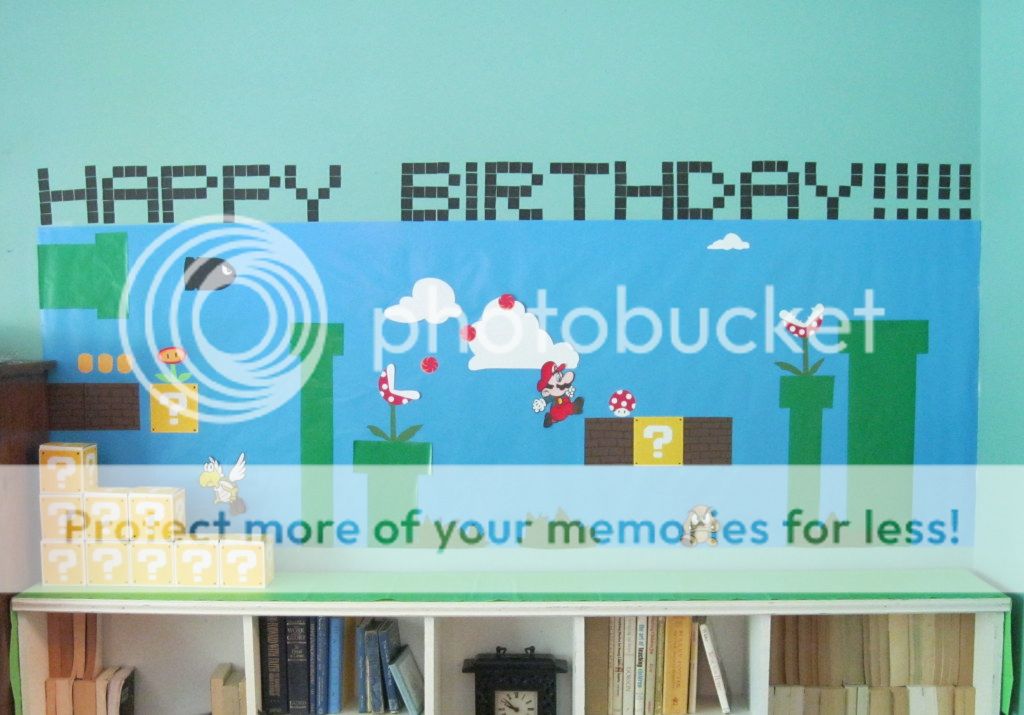
Video Game Party {the decorations}


I chose to do one focus wall, with lots of impact for this party.  The mural was really quite easy to put together & I was super happy with the results. {watch for the next post on how to make the ? mark block favor boxes}


First off I made a sketch, I wanted a general idea of how I wanted it to look on the wall.  A few changes were made here and there, but it's always good to start out with a plan :)

After I hung the blue paper up on the wall, I just started adding the elements.
  
The pipes are cut from green wrapping paper (just use a large ruler to measure & get your lines straight...a clear quilting ruler works great here).  

The clouds, grass clumps, coins and fire-power plant are free form shapes cut from card stock...as are the blocks (simple squares, with either a question mark...see favor box tutorial...or hand drawn lines to form bricks).  

For the Piranha plants & bomb, I used images from online and made a simple template, layering colors to get the right effect.

I cheated with the Mario, Goomba, and Turtle, just printing off coloring pages to size, coloring them in & cutting them out.

The "Happy Birthday!!!" took a bit more time, but I think it is well worth it.  First I printed off the message in Unibody 8 to use as a "map".  I then taped 1 inch black squares {electrical tape would work great here) above the mural to form the words.  After getting the first few letters done, it was easy going.


I always use my kids to judge my ideas/projects and this one got a big AWE-some!!! {which really makes it all worth it}

2.15.2012

Valentine's Day

Did you have a wonderful day? 
We did...as with most years, our Valentine celebrations are centered on our family, not just the hubby & I...

Here's how it went...


For the dining room I hung streamers of bright pink curling ribbon (curled slightly in sections), cut out paper hearts & paper heart chains


The place settings....

Scalloped felt place mats: cut a rectangle out of red felt (any size you like.  Fold accordion style and round each end.  Unfold and trim/clean up and scallops that need it.

Conversation jelly beans in a pink paper cupcake liner made for fun dinner talk & the kids were dying to eat their brownies (baked in a muffin tin) before dinner started.  

To make the cupcake topper, cut 2 circles of coordinating card stock, one measuring 1/4 inch larger. Decorate smaller circle with a heart sticker, then affix to the front of a bamboo fork with a glue dot.  Affix the larger circle to the back of the bamboo fork, making sure to center the smaller circle on the larger.

On the menu, heaping portions of homemade lasagna (recipe follows), garlic bread & Sprite with maraschino cherries


Our Favorite Lasagna

1 lb. ground beef, browned & drained
1 pkg. no-boil lasagna noodles
1 extra large (or 2 regular) jars of your favorite marinara sauce
1 small container ricotta cheese
2 eggs
salt & pepper
1/2 cup grated Parmesan cheese + additional
3-4 cups shredded mozzarella cheese (depending on just how cheesy you like it)


1. In a bowl combine: ricotta, eggs, salt and pepper, & Parmesan, set aside.
2. In a 13 x 9 inch casserole dish layer:
1 cup sauce
4 lasagna noodles
1/3 of the ricotta mixture
1/2 of the ground beef
a good handful or so of mozzarella
1 cup sauce
4 lasagna noodles
1/3 of the ricotta mixture
mozzarella
1 1/2 cups sauce
4 lasagna noodles
last of the ricotta mixture
last of the ground beef
mozzarella
1 cup sauce
4 lasagna noodles
remaining sauce
mozzarella & extra grated Parmesan

3. Cover with foil, bake at 350 degrees, until bubbly & noodles are tender, about 50 minutes.  Remove foil and cook additional 10 minutes or so until cheese is brown & bubbly.  

4.Allow to cool 10 minutes (at least) before cutting...this will ensure your layers stay pretty & together :)

10.31.2011

Happy Halloween!

Here's a little Halloween Inspiration from KayC (my mom <3) 
at 


...didn't she do an awesome job?
(Her house always looks great)
Thanks for sharing Mom!


10.21.2011

SpOoKy

This year our decorations are a little scarce...but don't worry--I'll have a guest blogger soon--KayC from Anna Clo't & Me {who just happens to also be my mom} She has some fantastic Halloween decorating ideas to share with you :)


Here's a little of my house {scroll down for a easy Halloween cooking craft too!}


*******


Marshmallow Fondant

4 cups mini marshmallows
2 tablespoons water
Food coloring and/or flavoring (opt)
4 cups powdered sugar + extra for rolling

1.           Measure marshmallows into a microwave safe bowl.  Add water and microwave for 1 minute.
2.           Remove from microwave and stir until completely smooth.  If any lumps remain, microwave for an additional 30-45 seconds, then stir again.
3.           Stir in any colorings or flavorings you would like.
4.           Stir in powdered sugar 1 cup at a time, until you can no longer stir by hand.
5.           Turn fondant out onto a clean surface, generously dusted with powdered sugar.  Knead until smooth, adding additional powdered sugar as needed.
6.           Thinly rolled-out fondant works best.  Cut or shape into shapes to decorate cupcakes or use to cover thinly frosted layer cakes.
7.           If not using right away, store fondant a tightly closed storage bag in a cool room or refrigerator.  Knead fondant to warm up before using.

**For frosted cakes apply fondant at the last possible moment for best results.**

To make Fondant Lollipops {pictured above}, sandwich a lollipop stick between two thin circles of fondant.  Use a tiny, TINY bit of water on one side to adhere the circles together.  Top with a Halloween cut-out also adhering with a tiny bit of water.  For best results, let the fondant dry overnight so that it hardens up a bit.

Make a fun flat cupcake topper by just using the top layer {only use one circle decorated with a Halloween cut-out}. Lay it flat atop your frosted cupcake.

******

 Looking for some Halloween Goodies from Anticipation?  You're in luck! All Halloween items are now 20% off...plus enter coupon code SPOOKY and receive free shipping {U.S. addresses only}

Happy Haunting!
Pin It

9.29.2011

A Little Autumn Inspiration


Are you ready for fall? and Halloween? and the Holiday Season?  I am!


The Halloween decorations are getting broke out this weekend...so watch for some great holiday decorating tips (& to see what I come up with this year).  Until then here's what it looked like last year & the year before...and if you need a little more inspiration, check out my two fall Etsy Treasuries on the side bar-->
(or here and here)


Happy Autumn!

4.12.2011

Sugar Eggs for Easter


For the eggs, you'll need:

1. Mix 1 cup sugar with 1 tsp. water and a few drops of food coloring.  Mix well with your hands until all the sugar is dyed (you can wear gloves for this if you like, but the sugar keeps your hands dye-free).


2. Press sugar firmly into your mold.  I used large, plastic easter eggs.  You can also use egg shaped molds found in the cake decorating or soap making aisle at your craft store.  You can also find them on Etsy.


3. Gently scoop out some of the sugar from the center, making sure you leave a good edge.  You will be able to make the egg thinner in the last step.  Make sure the sugar is still packed into the mold tightly.

4. Carefully turn eggs out onto wax paper (like you are building a sand castle).  Allow to dry for a few hours to overnight (I think overnight is best).

**Each batch of sugar made two of my easter eggs with a little left over...It made one large egg. If you like you can use the leftover sugar to make marbled eggs, by just packing in 2 or 3 colors**

5. When the eggs are comletely dry, use a table knife to clean up edges and scrape out the center of the eggs a little more.


Now we're ready to decorate, for the Royal Icing you need:

1. In a large bowl, with a mixer fixed with a whisk attachment.  Slowly mix together 1/4 cup meringue powder (available in the cake decorating aisle) and 6 Tb. of water.  Scrape down the sides as needed.  When mixed well turn mixer up to high and beat until stiff peaks form.  Add powdered sugar and beat until thick and fluffy.  It should look like this <---. 

2. Add coloring to your icing if you like.  Fit your pastry bags with couplers and decorating tips.  Fill bags with icing.  Royal icing dries very quickly, cover any leftover icing with a damp cloth.

3. Decorate...have fun and be creative :) I added little sugar pearls to mine...there are lots of sprinkles and decorations that would be fun to add.  Allow icing to dry and fill with jelly beans or small candies...Although the eggs may look tasty, I don't recommend eating them :) 
Happy Easter! 

Pin It

10.13.2010

Getting Ready For Halloween


It's starting to look spooky here...
Our entry way is shrouded with cobweb curtains full of spiders and bats fluttering overhead...

Our living room is home to 3 extra large bats flying inside the window & family pictures have been replaced with spooky silhouettes.  Plastic pumpkins trick or treat baskets have been stacked in the bookcase...
awaiting strobe lights & our Halloween party.

Not all our decor is spooky...Autumn is brought in with silk leaves in bright colors that I stitched onto branches from outside & grouped in 3 in front of a mirror.


How do you like to decorate for Halloween?

Spooky? Silly? Fun? Creepy?

Upload your Halloween decorating pictures to share on my Facebook fan page here. I can't wait to see what you've done.

 
Related Posts with Thumbnails